Shooting trains at night can be troublesome so I here’s a few tips on shooting at night using manual settings. You can also shoot on auto, but you’ll get better results if you use manual as the headlights from a train can “fool” your camera on auto. Also, many folks photograph trains at night using flash, but that’s another ball of wax and involves a lot more work and I won’t be covering that in this article.
First and foremost are two things. Use a tripod and turn off your VR on your camera or lens, otherwise when shooting it can cause blurry images when shooting on a tripod. If your gear doesn’t have it then you don’t need to worry. This applies if you’re using a tripod.
For best results use the fastest lens you have with the fastest shutter speed. if you are hand holding also use the highest ISO you can, but no higher than you must, and when hand holding use the VR if you have it. It’s also a good idea to brace yourself against something to help hold the camera steady when hand holding at night.
Shoot a test exposure based on what the camera tells you. If it’s too dark, increase the exposure, too light, decrease it.
Join other night photography groups on Facebook so you can see what other people are doing and how.
Use the self-timer when possible when shooting at tight. It helps eliminate camera shake from when you press the shutter. Better still, get an electronic cable release.
Learn to manually focus your camera. Auto focus at night can be troublesome.
If your camera has a setting for Locking the mirror up before taking your picture, then use it. When shooting at night, sometimes the slap of the mirror can cause camera shake.
Pop over to YouTube and watch videos on shooting at night. There’s a wealth of them available and free!
Night photography of trains and railroads can be very dramatic and enjoyable, but it can take time along with some trial and error till you get used to it, but very rewarding. When trackside at night or anytime always remember to be safe!!
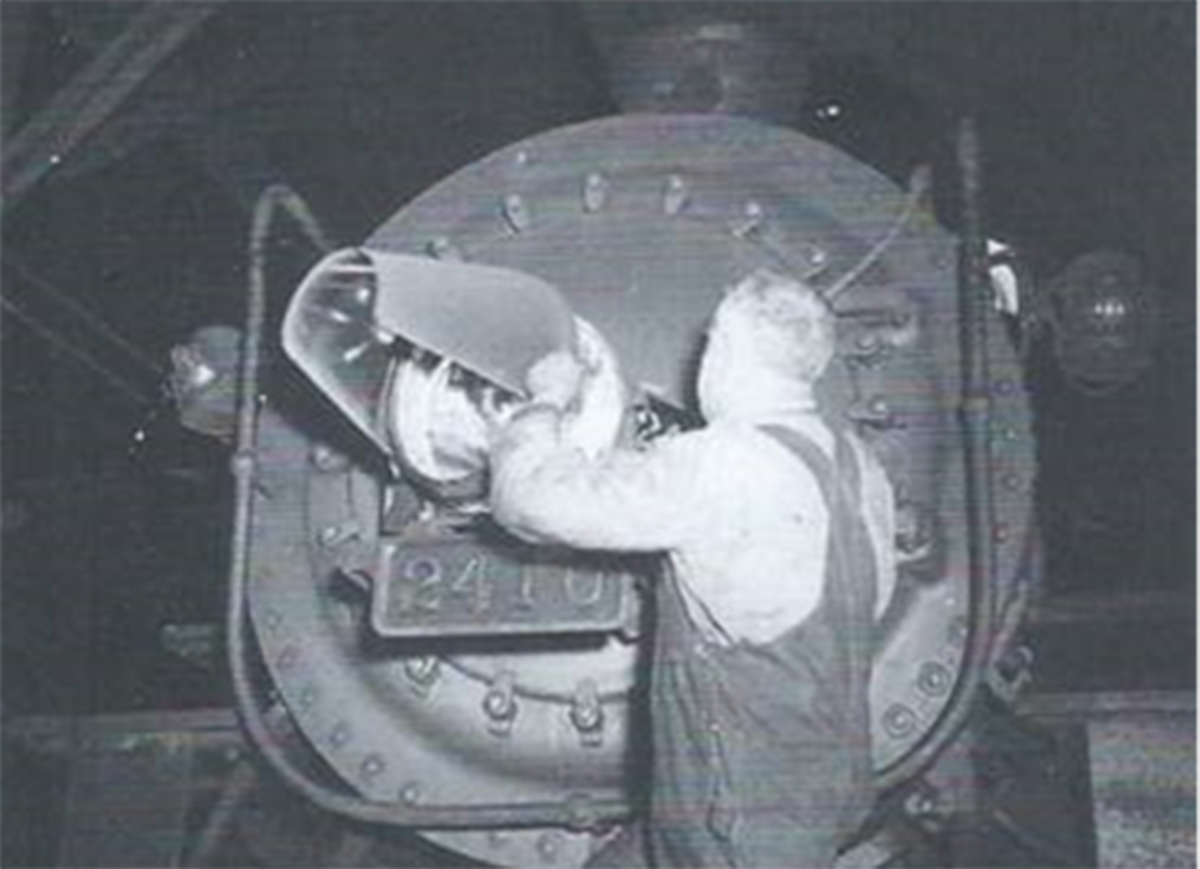
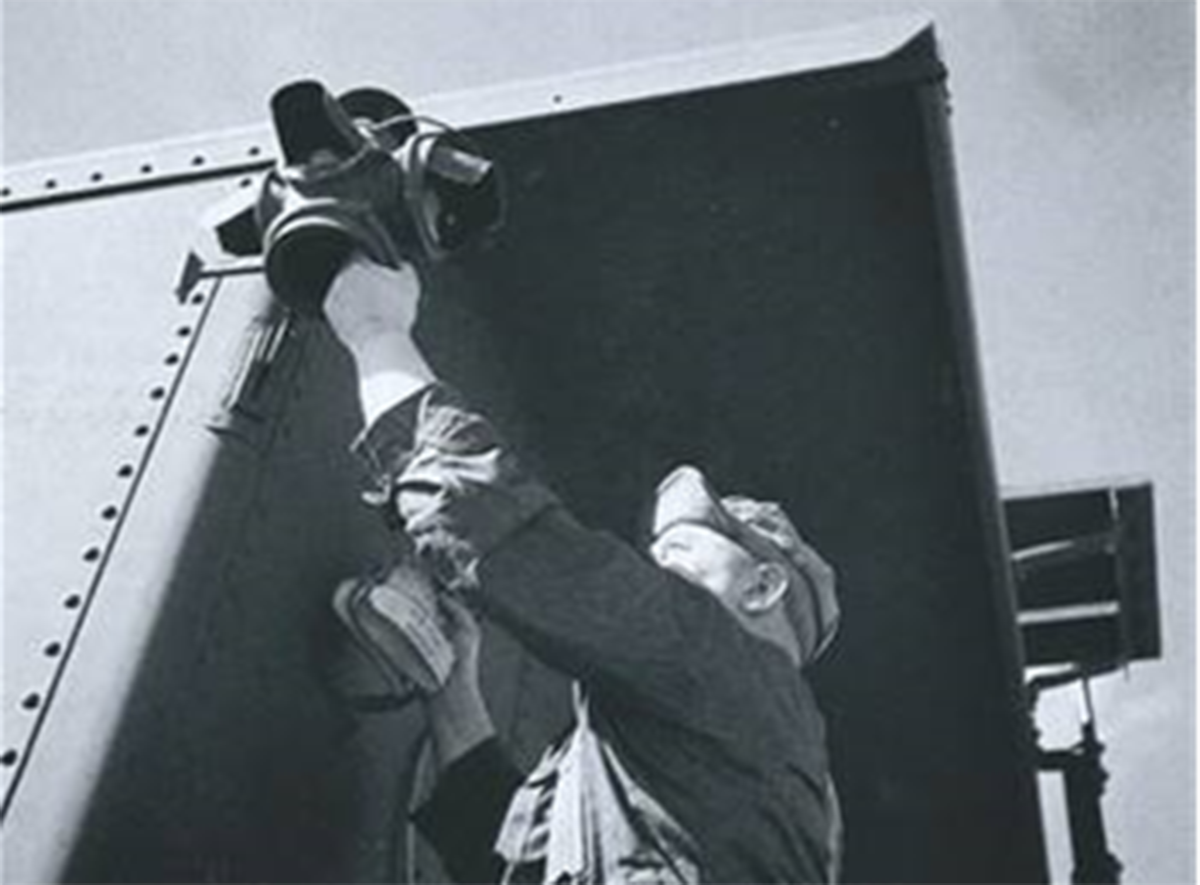
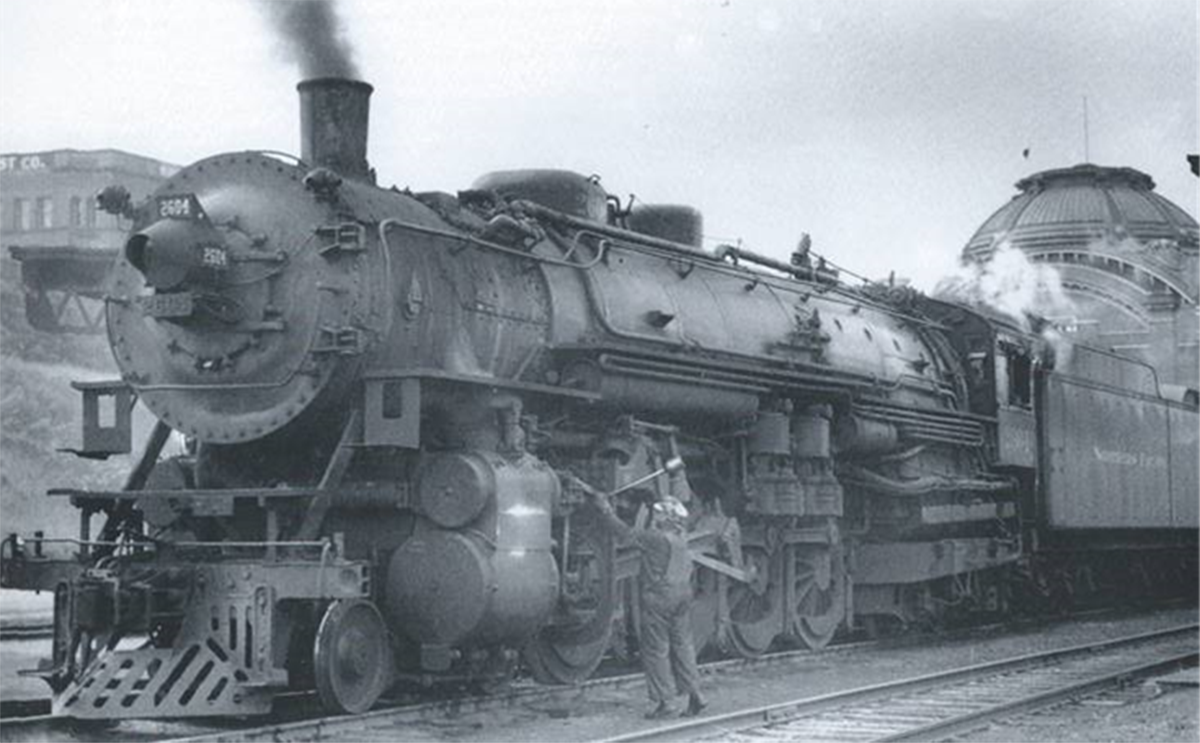
Submitted by Gary Ostlund – After Pearl Harbor and the start of World War II, the railroads quickly took measures to protect themselves. Note the hoods over the locomotive headlight and marker lights. Even the small classification lights on the locomotive’s smokebox are hooded.
Not long after the December 7th attack the Japanese gained a foothold far out on the Aleutian Islands. With the threat of further air attacks railroads took these precautions along with shielded fireboxes, and blackened windows on passenger equipment.
On the civilian side, city street lights and windows were darkened. American and Canadian military forces building the ALCAN Highway deliberately built curves in the road to hinder the ability of enemy aircraft strafing convoys. Some of those curves were still visible in 1973.
Credits: NP 2604 at Tacoma – Jim Fredrickson, SP 2470 headlight – Jack Delano, Caboose marker light – Southern Pacific Lines.
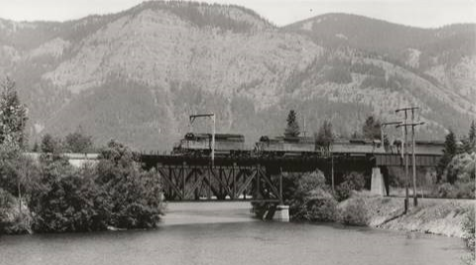
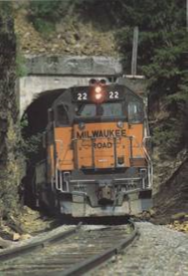
A week ago (preceding page), I stumbled portraying the closeness of the Milwaukee Road to the Northern Pacific Railway trackage. The two pictures here are the same location as last week’s Northern Pacific eastbound North Coast Limited, just nosing under the bridge. In both pictures above, the Milwaukee freights are westbound. The tunnel where #22 is exiting is about two car lengths behind the four diesels. If you were to Google-Earth this location you would see the valley is quite constricted here. The river is flowing away from the photographer.
The four diesels are crossing the Yakima River, but will only remain on that side for about a mile. The Milwaukee line continues up the Yakima River Valley, ducks into a short tunnel, follows the shoreline of Lake Keechelus, enters two snow sheds before the 11,789-foot Snoqualmie Pass tunnel. Both railroads enjoy relatively level travel up the valley, the Milwaukee all the way to the long tunnel. Northern Pacific trackage climbs a 2.2 percent grade from just behind the cameraman for about six miles to their Stampede Pass Tunnel.
The NP and Milwaukee do chase each other at various locations in the states of Washington and Montana. They are within sight of each other from the scene in these pictures, Lake Easton to Ellensburg, most of 40 miles. In western Montana for many miles along the Clarks Fork River they are much like double-track in some places, and zip in and out-of-sight for about a hundred miles. They share sides of the Yellowstone River in eastern Montana for about 85 miles.
Picture credits: diesels on bridge by Robert W. Johnston; #22 at tunnel by Dale Sanders
Note: These are date changes from what appeared in the Pennyrile! I’ve made these adjustments to better allow the production of the calendar in time for the holidays.
Below are the dates for upcoming chapter photo contests. During the months listed all members are invited to shoot pictures and submit no more than two entries to webmaster@westkentuckynrhs.org by the deadline listed next to each contest. You must be a paid member of the chapter to participate in these contests.
Jim Pearson will judge the photos and select 1st through 3rd place and the winners will be presented in the PennyRail and on the chapter website. We’ll also view them at the meeting following each contest.
At least the 1st place winners will be used to produce a chapter calendar for the next year. All submissions must have a caption that lists at least the railroad, location and date with photographer’s credit and any other relevant information.
January 1-31, 2018
Submission Deadline: February 7, 2018
March 1-15, 2018
Submission Deadline: March 22, 2018
May 1-15, 2018
Submission Deadline: May 22, 2018
July 1-15, 2018
Submission Deadline: July 22, 2018
September 1-15, 2018
Submission Deadline: September 22, 2018
November 1-15, 2018
Submission Deadline: November 22, 2018
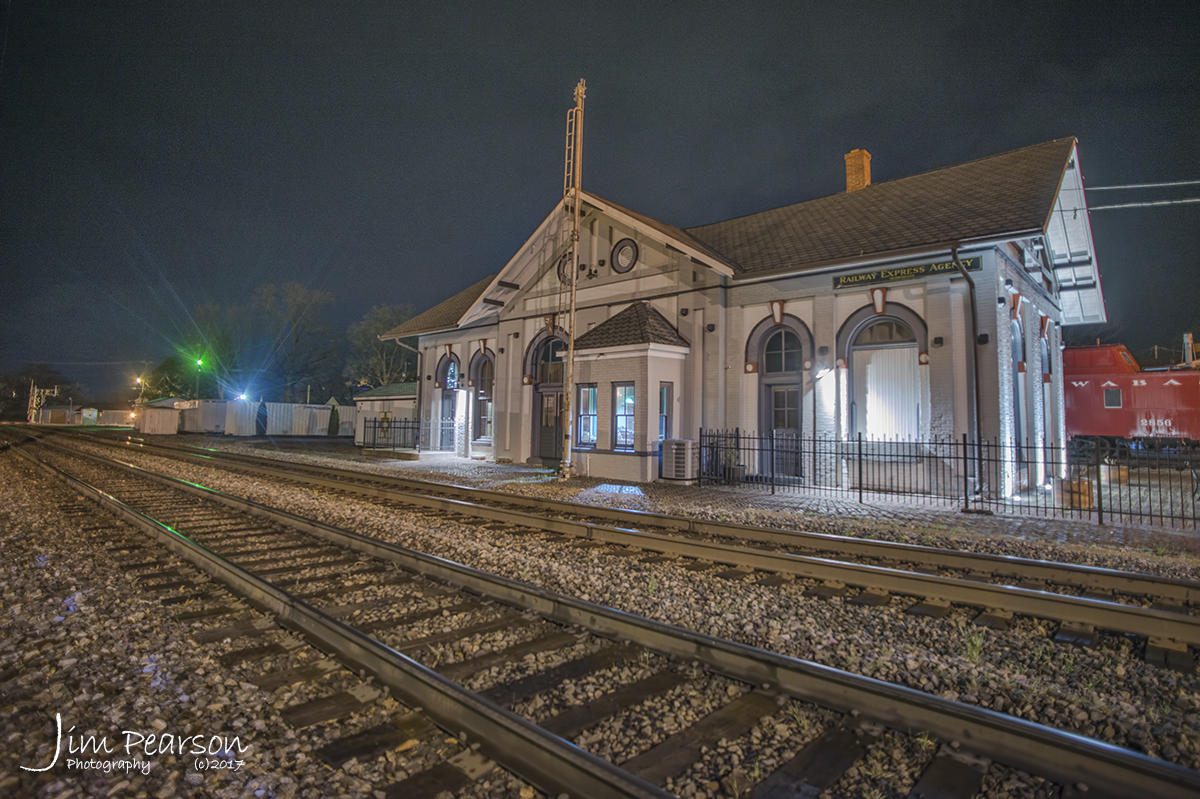
March 25, 2017 – The Princeton railroad station was built in 1875 and has been beautifully restored. Once housing the C&EI and L&N railways, it was the lifeline of commerce and transportation for the county. Passenger service was discontinued in the late 1960’s. The Princeton Train Depot is now home to the Gibson County Visitors Center and features a railway museum with a restored train caboose.
Sometimes I start out planning to do one thing when I set off on a railfan trip, but end up doing something different which usually results in nice photos I wouldn’t have gotten otherwise!
I try to do some railfan photography several days during the week, usually Wednesday, Thursday and Saturday. Mostly because on CSX’s Henderson Subdivision, which runs here through Madisonville, Ky, these are the busiest days.
Well, last saturday, March 25th, 2017, the weather was overcast and it was drizzling rain off and on most of the morning as I sat here working on the computer and trying to motivate myself to get out the door and on the road. Yes, I too sometimes have to motivate myself to take pictures! LOL
After posting a few queries on Facebook to a couple railfan groups, about current traffic for trains in the area I want to railfan, I finally decided that I was going to point my Toyota RAV4 north and see where it’d lead me!
Responses to the Facebook posts were providing some info that trains were out there moving, just not a lot of them, so it seemed, but that never deters me as I always seem to find them. For me it’s not about the number of trains, but catching unusual or different angles, scenes or trains when I’m trackside. This day seemed to start out challenging, to say the least!
March 25, 2017 – CSX Autorack train Q247 arrives at the north end of Howell Yard in Evansville, Indiana.
Out of Madisonville I followed CSX’s Henderson Subdivision north to Evansville, Indiana and during the whole trip I only saw and heard (I use a scanner to listen to the train traffic) one train, a southbound, which I was too late in catching to get a photo! It wasn’t looking good! 50 miles and only one train? Maybe I should have stayed home, but the clouds in the sky were fantastic and I was determined to catch some trains with them!
My first stop was CSX’s Howell Yards in Evansville, Indiana. This is a spot where you can drive all the way around the yard and get good shots from various angles. My favorite location however is on the west side of the yard across from the engine service facility. This is where I caught a autorack train coming into the yard heading south and empty coal train northbound from the yard. Knowing the route the coal train would take I decided to head on north toward Princeton, Indiana to get ahead of the coal train to catch it along its way north. This way I’d be sure of at least getting a few shots with a train.
March 25, 2017 – Empty coal train CSX E234 heads through St. James Curve at St. James, Indiana as it makes it’s way north on the CE&D Subdivision.
The first spot I wanted to catch the coal train was a location known by railroaders as St. James Curve, which is just outside the small hamlet of St. James, Indiana, just past I-64 off of Hwy 41 north. After arriving and waiting about 5 minutes the coal train, E234, graced my presence as it swept through the curve into the frame to allow me to catch this sweeping photo with the beautiful clouds in the sky! First photo I was really happy with from the day!March 25, 2017 – CSX empty coal train E234 heads north through St. James Curve at St. James, Indiana, on CSX’s CE&D Subdivision.
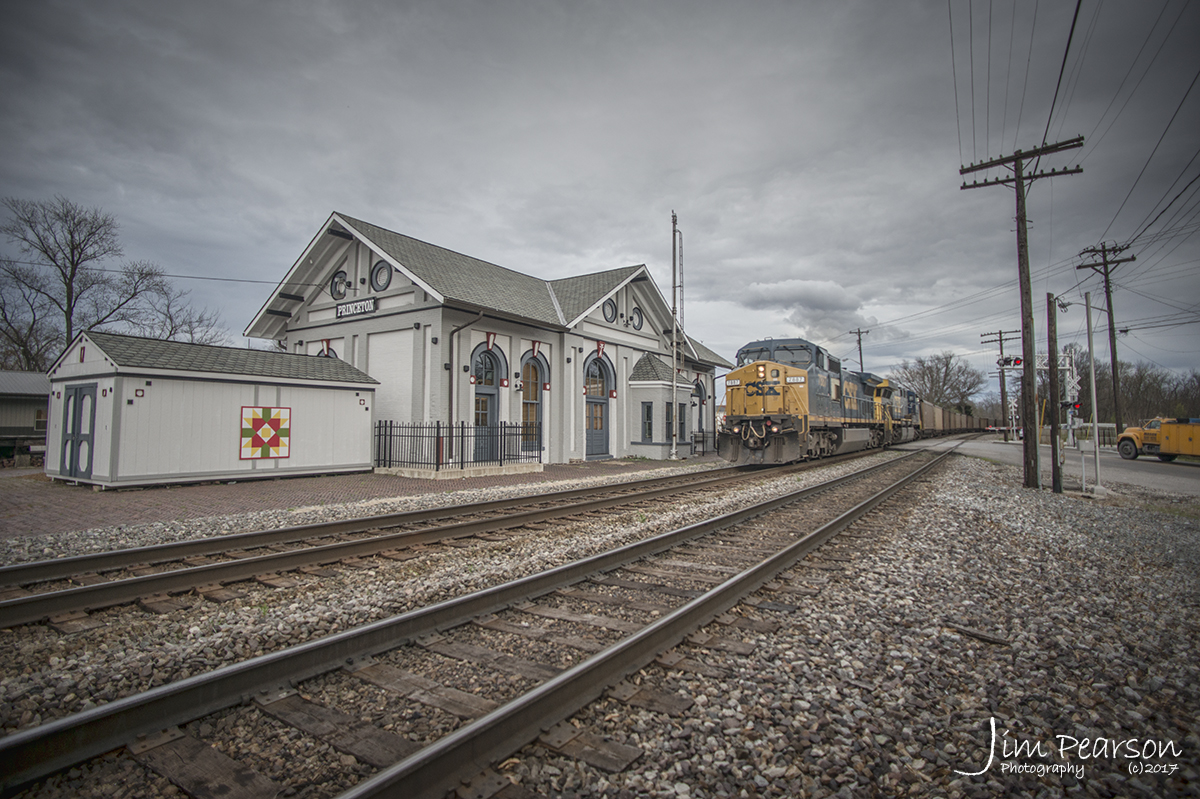
Knowing how fast the train was moving I knew I only really had one other spot I could get to before the train and that was the restored depot in Princeton, Indiana, which was the furthest I planned on going on this trip today.
Again, I was rewarded with this shot as the coal train prepared to pass the station as it continued its trip north.
March 25, 2017 – CSX empty coal train E234 passes the depot at Princeton, Indiana as it heads north on CSX’s CE&D Subdivision. The station was built in 1875 and has been beautifully restored. Once housing the C&EI and L&N railways, it was the lifeline of commerce and transportation for the county. Passenger service was discontinued in the late 1960?s. The Princeton Train Depot is now home to the Gibson County Visitors Center and features a railway museum with a restored train caboose.
At this point I was satisfied that I had a couple nice photos in the camera, but still I wanted more!
I had been in contact with fellow railfan photographer Ryan Scott via Facebook Messenger and phone, since I got to Howell Yard in Evansville. He also was out railfanning and we decided to meet up at the depot in Princeton to visit and railfan together.
That’s where things started to change from my original plan! We spent time looking and shooting at the Norfolk Southern Yard at Princeton and along the other lines in and around town and at the Alliance Coal Mine loop where coal trains load. Ryan then suggested night photos! He’s not had much success on shooting photos at night and was looking for some tips and help. I hadn’t planned on staying trackside that late, but it had been quite awhile since I did any night work so I went for it.
March 25, 2017 – The red light from signals light up the front of NS 871 with an empty Norfolk Southern coal train that tied down in Lyle Siding at Princeton, Indiana, waiting on a crew to take it on east on the NS Southern West district.
Now, for the railfan friends of mine that read this, here’s some of the tips I passed onto Ryan as we were shooting at Norfolk Southern’s Lyle Siding and in downtown Princeton during our night shoot that you might find helpful as well.
First, before we got out of the car, where we had some light, we set our cameras as follows:
Turn off auto ISO if you use it and set your ISO to 250.
Set your camera on manual and the shutter speed to 20 seconds with your lens aperture to it’s widest opening.
Remove any filters that might be on the lenses you’re going to shoot with. Otherwise you can get some ghosting in your photos when the lights reflect back into the filter.
Place your camera on a tripod!
Then set the self timer on your camera to somewhere between 3-10 seconds. This is to insure that there’s no camera shake, resulting in a blurred image, when you trip the shutter.
Review your first photo on your LCD screen. If it’s too dark, increase your exposure by giving it more time, ie 30 -60 seconds. If your camera won’t allow beyond a 30 second exposure then increase your ISO setting to give you another stop of light. That means go from 250 to 500 ISO, or something equivalent. I try to keep my ISO as low as possible as this helps to keep the noise (grain) down in the photograph. Keep adjusting like this until you get an exposure that you like and feel you can work in. If the photo is too light then of course you go in the other direction with your exposure.
March 25, 2017 – Great time shooting some night action with fellow railfans Ryan Scott and Dave Kunkle! We caught this empty Norfolk Southern coal train that tied down in Lyle Siding at Princeton, Indiana, waiting on a crew to take it on east on the NS Southern West district. A big shout out to Dave Kunkle who was gracious enough to be our “grip” and use his hat to cover a bothersome light on one of the RR Boxes next to the crossing!
Focusing can be an issue when shooting at night as well. I usually bring a bright spotlight to shine on my subject to aid in focus, but since I didn’t start out planning to shoot night photos, I didn’t bring one. So, we had to improvise.
Change your focus point to center weighted so you have a single point to focus with. Then pick a bright spot on your subject and try to focus. If the camera can’t lock in the focus using the brightest spot, then see if there’s not something brighter about the same distance away that you can focus on. Another thing you can do if you are shooting with someone else, is to have your friend stand in a safe spot next to your subject and turn their smart phone’s flashlight on facing the camera and focus on the light from it. Of course you can manually focus as well, but for my aging eyesight I find autofocus works better for me.
Now, once you have the camera focused you need to turn off the autofocus on your lens or camera. Otherwise when you press the shutter button on the camera it’s going to try to refocus when you take the photo, probably resulting in an out of focus photo. I personally use the back focus button on my Nikon D800 and turn it off on the shutter button. This way I don’t have this issue. Most of your DSLRs have this feature. If yours doesn’t then you’ll have to turn it off on the lens between subjects.
Other than that, shoot a lot and check your focus after shooting each photo! Do this by viewing the photo on your LCD and zooming in tight to check your focus. Nothing more disappointing than shooting a bunch of photos to find they’re soft or out of focus, after you get back home.
As you can see from several of the photos here, I came away with some nice photos for not really having planned for shooting at night.
Oh, by the way, I left to start this trip at noon Saturday and by the time I got back home it was 12:30 am Sunday morning. Sometimes, things work that way though! All in all a good trip! Be safe out there when you’re trackside or traveling!
This month’s photography column will be all about the equipment and software for capturing trackside videos using your smartphone.
From a composition standpoint video photography of trains is pretty much the same as regular still photography except of course you capture motion and can put together sequences and titles to help tell the story.
Turning your phone horizontally (to landscape mode) is the best way to record all your smartphone videos. Period! It’s much easier to handle the phone this way and you won’t see those annoying black side bars when watching your video on a large screen. Also, don’t forget that your TV and Computer Monitors sit horizontally and not vertical.
Plus, everything looks much beautiful recorded in horizontal (more room for your subject) vs. an ugly compress square. This format might be okay for Instagram photos, but not for videos.
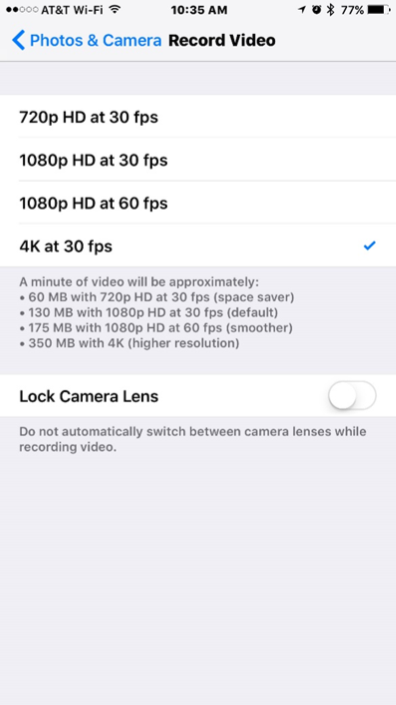
Depending on which smartphone you have will determine the quality of your video. The newer iPhones come with 4K video resolution (a far cry from the VHS days!), which is about as high a quality you can get these days. However, you need to make sure it’s set to record in the highest quality by paying a visit to the settings on your device. Be aware, the higher the quality of your video the larger your video file is and the more space it will take. Also, it will take longer to upload if you posting it online.
Below are screen grabs where you can set your video quality on the iPhone. Not sure where it is on other smartphones, but should be somewhere under your settings.
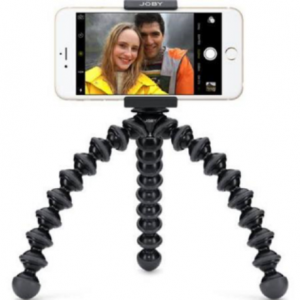
One sure sign of an amateur video recording (besides a video done with low lighting) is a shaky video. So, stop holding your iPhone and mount it on a stand. Working with a mounted iPhone will also prevent your shot from going out of focus.
One mount for the iPhone and other smartphones is the GripTight GorillaPod stand made by Joby. This flexible iPhone mount is an ideal accessory for all videographers on-the-go.
The stand is compact, doesn’t take up too much room and holds the phone safely and securely and can also be attached to poles and tree limbs. The GripTight mount can also be attached to most other tripods via a universal ¼” screw.
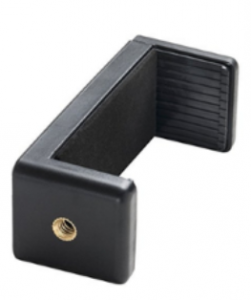
I personally use a regular tripod for my video work and attach my camera using the device below. It runs $8.99 on Amazon Prime. Click on the photo for a link. There’s many others available however if you just do a search.
If you don’t have a tripod, one stabilization trick is bracing yourself against something such as a light pole or tree. Another is to bring your elbows in tight against your body, which will give you more stability. Holding your breath during shots can also help minimize shakiness if you are hand-holding the phone on a solid surface.
While editing your video on the smartphone can be done, if you’re going to be serious about your video work it’s best to do it on a desktop computer. The controls are much easier to use. There are many programs out there that allow you to do this and one’s probably already installed on your Windows computer called Movie Maker. Many others are available as well on the market. My favorite is Adobe Premiere Pro. It’s a monthly subscription software that runs about $20 a month. I do a lot of video work for my church however and so I go with this heavy-duty software. Do a Goggle search and you’ll find all kinds of software, some free and some paid.
As for editing on the smartphone itself? I use an app called Cameo a lot, but I also use MoviePro, Pinnacle Studio Pro and iMovie. Easiest way to learn to use these programs is to shoot some video and play around with them. You can also search on YouTube for the app and find tutorials there as well. Other apps that get top reviews are, Videoshop, Splice, Quik and Video Crop. There are many others however.
Many of the above apps will also allow you to shoot video instead of using the built-in camera. These apps and others such as Filmic Pro allow you to have much more control over the shooting of your videos.
If you plan on doing a lot of long videos, then I recommend getting a battery pack for whatever kind of smartphone you have. Video recording will eat the battery on your phone quick.
Also, in closing, I recommend that you don’t zoom! Most smartphones use digital zoom and the quality of your video will suffer greatly if it does. If your phone has optical zoom or you have add on lenses for your phone, then they should be fine. Digital zoom only enlarges the pixels on your phone and lowers the quality of the video and photo.
Hope this hasn’t left your head spinning too much. If you have questions, please feel free to drop me an email at jim@jimpearsonphotography.com
This month we’re going to take a look at the free, yes I said free, app for editing your photos on iPhone, Android, Mac and the PC. The app was originally developed by NIK Software, but has since been bought out by Google, which distributes it. You can find it available in the app store or by searching on Google.
This is my go to app for editing pictures that I shoot on my iPhone 6s when I’m out trackside or anywhere else taking photos. It’s super easy to use and there’s tutorials available all over the web. I’ll provide links to some at the end of this column. Also, I’ll provide a brief overview for you in this column.
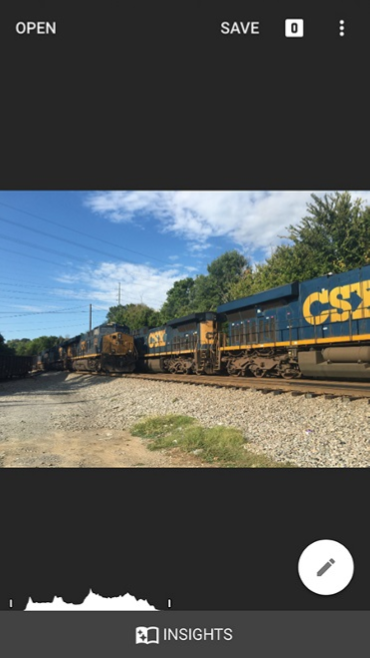
When you first open Snapseed you’ll get the opening screen which prompts you to select and open the image you want to work with. You have several options. You can choose a photo from your camera roll, or whatever your device calls it, take a photo with the camera, open your latest image or paste in a copied image.
Once the image is open you’ll notice several options at the top of your screen which are Open, which opens a new image, Save, which gives you several options which include, save, save a copy and cancel. I use the Save a copy option as it allows you to go back and made changes to what you’ve done to the photo in Snapseed. It also preserves your original photo. Next to the Save feature is a small white square that will contain numbers as you apply different effects to your photos. These edits, called stacks or layers, allow you to revisit something you’ve done to the photo and change or delete the edit.
To the right of the small white square are three white dots. Tap this to access other options including, Undo, Revert, Share, Help and Cancel.
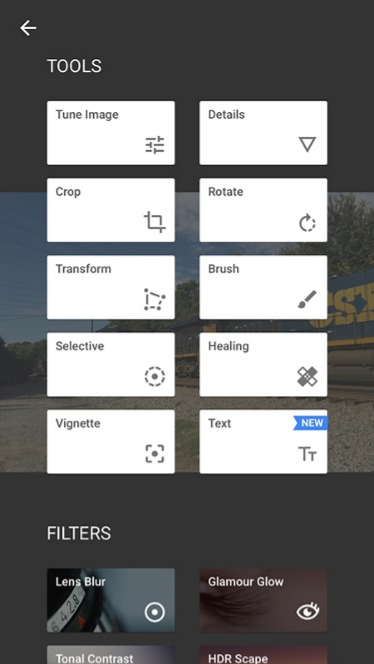
After you’ve opened your image you’ll notice a large round dot with a pencil in it in the lower right of the screen. Tap this to bring up your tools for editing. They’re pretty intuitive and easy to figure out. Under TOOLs you’ve find Tune Image, which allows you to adjust everything from brightness to shadows. Once you selected it just press and hold down on the screen to bring up a menu to change between the different options. Once you’ve selected an option slide you finger back and forth across the screen to change the effect. This procedure is the same in all the features you’ll encounter in Snapseed. To apply your changes just click on the checkmark on the bottom of the screen. If you want to see your histogram click on the small icon on the left of the screen.
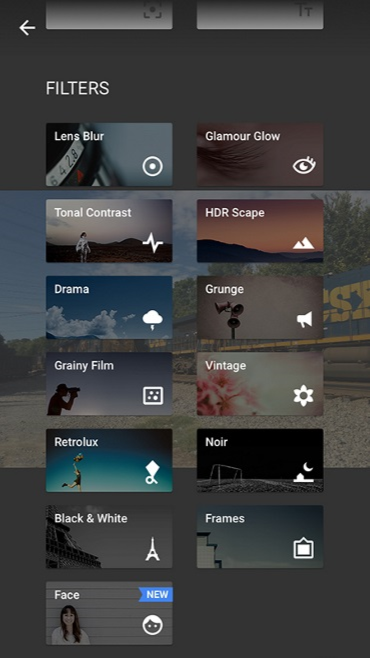
Also under the tools screen you’ll find FILTERS (left). These allow you to apply creative effects to your photos such as Lens Blur, HDR Scape, Black and White along with many more. It also has an option for adding frames to your image as well. Playing around with them is the easiest way to figure out what each one does. If you decide you don’t like an effect just click on the small x on the screen at the bottom left where you’re editing and cancel the edit.
If you want to zoom into your photo during an edit, just pinch in or out and use the navigation box by using the blue box that appears in the lower left corner.
Once you’ve edited your picture to look the way you’d like just click on the save button in the upper right corner and choose the option you wish to use. As I said before, I highly recommend the Save a copy option.
Also, for help, there’s a button at the bottom of the screen that says “Insights.” Click on it to bring up tutorials and videos on how to use Snapseed.
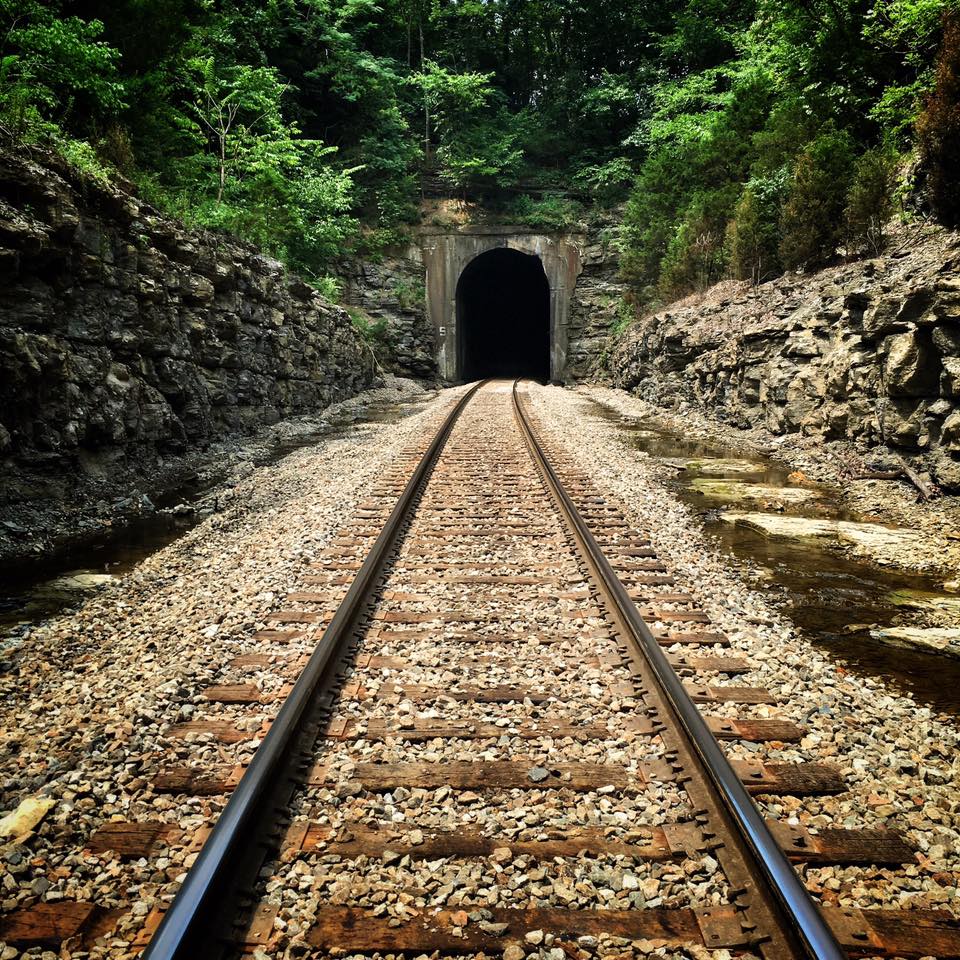
On July 22, 2016 I made a trip to find the South Tunnel on CSX’s Mainline Subdivision. I didn’t catch a train unfortunately, but this shot taken with my iPhone 6s really doesn’t need one! Look for photos that can provide you with good leading lines to help draw your subject into your picture!
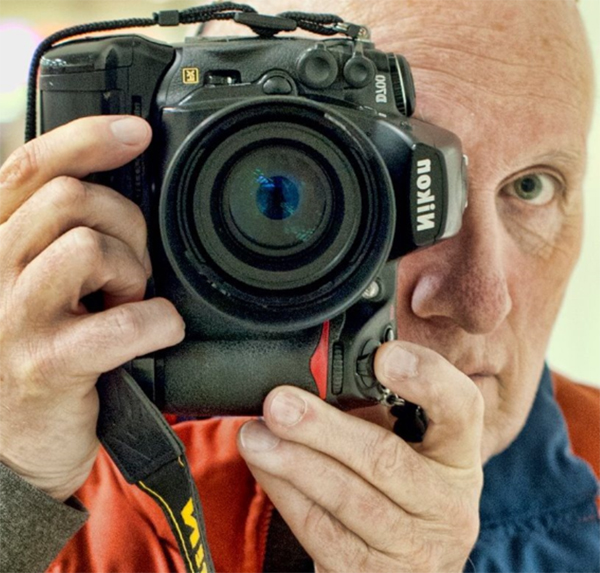
Welcome to my first installment on this new column for the Pennyrail! I hope that everyone gets at least something from my ramblings here!
The Best Camera I’m often asked what’s the best camera to use when taking photographs? My short answer is, the one you have with you! It doesn’t really matter what brand you use or like as long as you get out trackside and shoot pictures!
Now, of course some cameras offer better results than perhaps others, but what it all comes down to is that it’s the person behind the camera that “makes” the picture, not the equipment you use! I shoot and have seen others shoot with everything from smartphones to high priced digital cameras, but what it really comes down to a lot is you, the photographer and how you see and capture the scene before you! That’s what I love about photography, the ability to decide when and what I want to photograph. No one else tells me, or you, when to press the shutter.
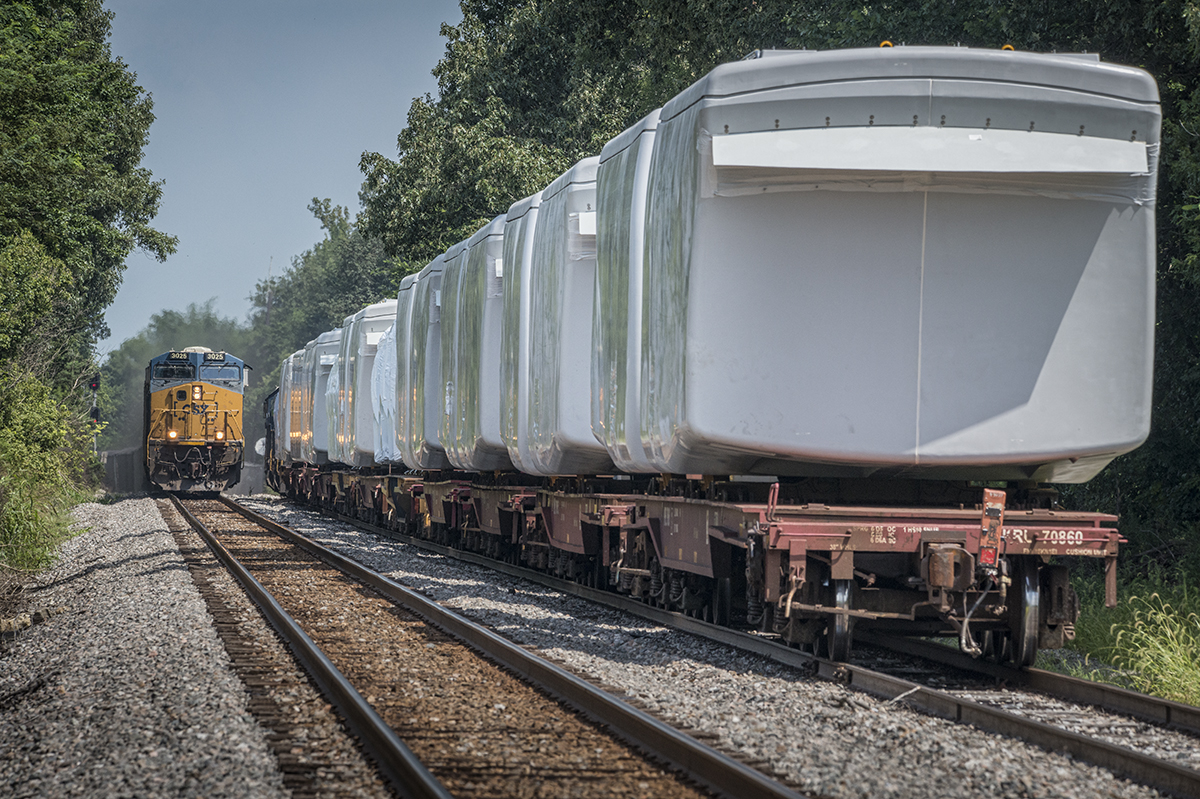
August 5, 2016 – Southbound CSX loaded coal train N320 (Evansville, IN (EVWR) – Cross, SC) meets W987-30 with a load of windmill motors waiting to go north from the north end of Hanson siding as N320 makes it’s way south on the Henderson Subdivision at Hanson, Ky. – Tech Info: 1/640 | f/13 | ISO 720 | Lens: Sigma 150-600 @ 290mm with a Nikon D800 shot and processed in RAW.
Simple advice to keep in mind when shooting pictures. First and foremost, if something in your picture doesn’t contribute to what you want the final photo to say then eliminate it when your shooting. Do this by getting closer, lower, higher, picking up trash or whatever else it takes. It’s much easier to do it before you shoot than it is to have to do it in the computer. Second, when shooting trains, don’t get hung up on the direction of the light! It is what it is and you can’t always control it. You have to shoot the picture when the train and you are there! Third, don’t shoot everything from eye level! Get low sometime to add drama to your pictures, or high sometimes to give a different perspective. Fourth, don’t shoot just on bright and sunny days. Great pictures are to be made on cloudy, rainy, snowy filled days.
Fifth, don’t put the camera away when it gets dark! Drag out the tripod or fast lens and shoot! There’s great pictures to be made during twilight and after dark. Sixth, Study the pictures of photographers you like! Ask yourself questions such as why did he shoot form this angle, time of day, etc. Seventh, look for things to photograph that are different. Heritage Locomotives, Steam Engines, Unusual paint schemes, obscure out of the way short lines, trains with different types of cargo, etc. I hope some of these help and good luck trackside and always be safe! Keep Clicking!!!


 This month’s photography column will be all about the equipment and software for capturing trackside videos using your smartphone.
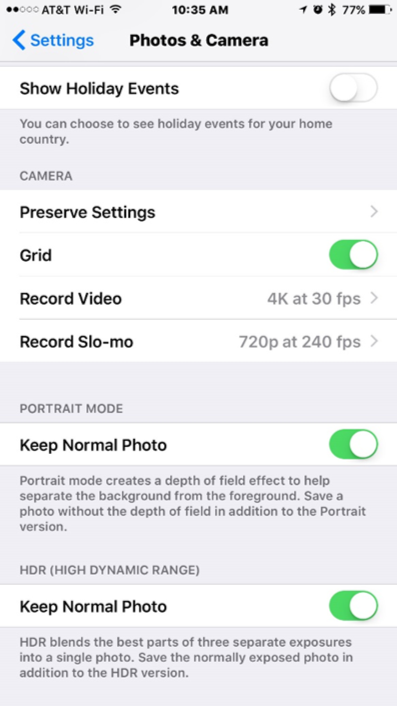
 One mount for the iPhone and other smartphones is the GripTight GorillaPod stand made by Joby. This flexible iPhone mount is an ideal accessory for all videographers on-the-go.